Bowser’s Fury Trickity Tower Cat Shines – Where to find Trickity Tower Cat Shines
Where to find the main Trickity Tower Cat Shines
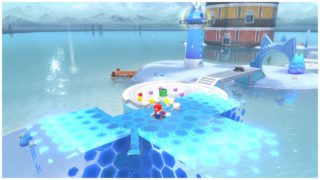
Trickity Tower Cat Shines are the subject of this guide, in which we break down each Cat Shine and its location within this region of Bowser’s Fury and Lake Lapcat.
Trickity Tower Cat Shines
By the end of this guide, you’ll know where to find Trickity Tower Cat Shines, and for other regions you can click back to our Cat Shine locations guide for the other locations.
So Close Yet So Far
You’ll see the Shine right ahead of you from the start of the stage, but as you approach it you’ll hit a blue invisible wall. Follow it around to the other side of the circular area where the Shine is located, and you’ll find a blue path leading away from it. Follow this path, using the enemies to help guide you where to go. When you reach a second blue cylindrical wall in the air, turn right and go round it to find the next part of the path. Eventually you’ll reach the top and see a large column of gold rings: jump through this to reach the Shine.
Blue Coin Bustle
Hit the blue switch at the start of the stage to make some blue coins appear. As long as you continue to collect each group of coins quickly enough the next group will appear, eventually forcing you to walk the same path as you did for the first Shine. Once you get them all, the Shine will appear back at the switch.
Hurry! Watch Your Step!
Hit the large switch at the start of the stage to make some platforms appear in mid-air. There are some invisible blue platforms between them so it’s actually easier to follow the path than it first looks, but it’s still a tight run to reach the Shine at the end before the timer runs out.
Trickity Tower Cat Shine Shards
You can find the Trickity Tower Cat Shine Shard locations here:
- When you go around the first Shine and reveal the long invisible blue path, the first Shard is in the water underneath the first blue platform that’s revealed.
- When you start making your way along the long invisible blue path, you’ll see the second Shard near the first Spike you find (the guy who throws the big spiky cylinders at you).
- As you continue along the invisible blue path, when you reach the large column of wooden boxes, don’t ground pound them: walk past them and you’ll be able to jump up to a ledge where you can reach the third Shard.
- Continue to follow the invisible blue path and you’ll make it to the big invisible blue cylinder. Walk around it and you’ll find a path with some coins on it: this leads to the fourth Shard.
- When you reach the end of the invisible blue path (just before where you drop down to collect the first Shine on this island), look around and you’ll see the final Shard below you. It’s actually on its own invisible platform but if you’re wary it might be best to switch to Tanooki Mario and float down to it.
Blast the Fury Blocks
The Fury Blocks are in the air, off to the right of the entrance arch. As you approach them you’ll make invisible blue blocks appear, these let you climb up and stand next to the Fury Blocks. Wait for Bowser or trigger him with a Bowser amiibo and he’ll break the blocks with his fire breath as usual, uncovering the Shine.
Bowser's Fury Cat Shine locations
- Fur Step Island Cat Shines
- Scamper Shores Cat Shines
- Pounce Bounce Isle Cat Shines
- Fort Flaptrap Cat Shines
- Slipskate Slope Cat Shines
- Clawswipe Colosseum Cat Shines
- Trickity Tower Cat Shines
- Crisp Climb Castle Cat Shines
- Pipe Path Tower Cat Shines
- Risky Whisker Island Cat Shines
- Mount Magmeow Cat Shines
- Roiling Roller Isle Cat Shines
- Plessie Medals and Rings Cat Shines
- Cloud Cannon and Rabbit Chase Cat Shines
- Purple Switches and Lake Lapcat Cat Shines
Bowser's Fury Missing Kittens and Toads
